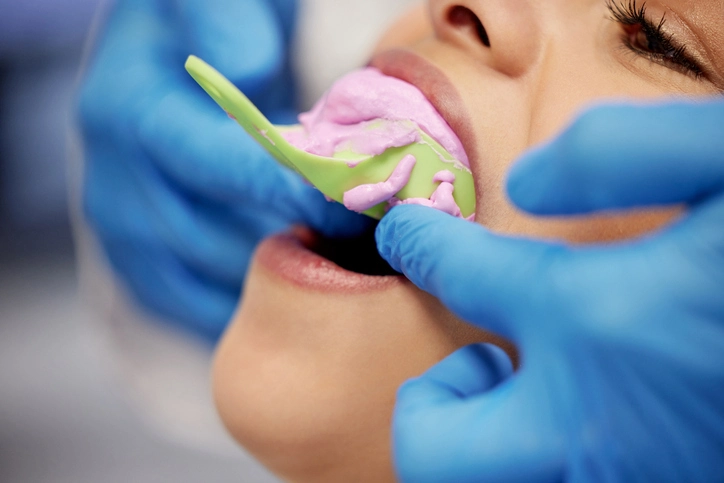
Dental impressions are critical for the fabrication of removable and fixed prostheses. An accurate impression ensures the proper fit, function, and aesthetics of the final prosthesis. The process involves creating a negative replica of the oral structures, including teeth, gingiva, and surrounding tissues. The choice of impression techniques depends on factors such as the type of prosthesis, patient-specific anatomical considerations, and material properties. This article explores the techniques used for impressions in removable and fixed prosthodontics, emphasizing the principles, materials, and clinical steps involved.
Table of Contents
ToggleIntroduction to Impression Techniques
Dental impressions are categorized into two primary groups based on their intended prosthesis:
- Removable Prostheses – Complete dentures, partial dentures, and overdentures.
- Fixed Prostheses – Crowns, bridges, inlays, and onlays.
Each prosthetic type demands specific considerations for impression accuracy to replicate the oral tissues’ static and functional states accurately.
Impression Techniques for Removable Prostheses
Removable prostheses rely on both functional and static impressions to provide retention, stability, and comfort.
Objectives
- Capture the supporting tissues in their functional form for load distribution.
- Achieve accurate border molding for peripheral seal.
- Ensure proper occlusal relationships.
Materials
Common impression materials for removable prosthesis impressions include:
- Alginate – Affordable and suitable for preliminary impressions.
- Zinc oxide-eugenol – Ideal for final impressions in edentulous arches.
- Polyvinyl siloxane (PVS) – Provides high accuracy and dimensional stability.
- Impression compound – Often used for border molding.
- Elastomers – Useful for capturing undercuts and finer details.
Techniques
Preliminary Impression
- Purpose – Capture a rough replica of the oral structures.
- Materials – Alginate or impression compound.
- Procedure – Use a stock tray to take an impression. Ensure that all critical anatomical landmarks, such as the vestibule, are included. Pour the impression into stone to fabricate a custom tray.
Final Impression
- Custom Tray – A custom tray enhances accuracy by minimizing material thickness and distortion.
- Border Molding – Performed with thermoplastic compounds or elastomeric materials. Captures the dynamic movements of soft tissues.
- Selective Pressure Technique – Applies controlled pressure on primary support areas while relieving secondary areas.
- Functional Impression Technique – Uses tissue-conditioning materials to capture tissues under functional loading.
Special Techniques
- Split-Cast Technique – Combines multiple impressions for areas with undercuts.
- Mucostatic Technique – Captures tissues in their uncompressed state, often preferred for patients with highly displaceable tissues.
Impression Techniques for Fixed Prostheses
Fixed prostheses require detailed impressions that accurately replicate the prepared tooth structure and its surrounding soft tissues.
Objectives
- Record the margins of the prepared tooth with clarity.
- Capture adjacent teeth and tissues for proper occlusion and contacts.
- Provide dimensional stability for laboratory work.
Materials
The choice of impression material depends on the clinical situation, practitioner preference, and patient needs:
- Polyvinyl siloxane (PVS) – High accuracy and dimensional stability.
- Polyether – Excellent detail reproduction and hydrophilic properties.
- Alginate – Used for preliminary impressions but lacks precision for final impressions.
- Impression plaster – Rarely used today but offers high detail in special situations.
Techniques
Single-Step Technique
- Involves a single mix and placement of impression material.
- Suitable for less complex preparations.
- Risk of distortion if not handled promptly.
Two-Step Technique
- Procedure – A preliminary impression is made using putty material. A wash material (low-viscosity) is used to refine the details.
- Allows for better control over the seating of the tray and adaptation to fine details.
Dual Arch Technique
- Uses a specialized dual-arch tray to capture the prepared teeth, opposing dentition, and bite registration simultaneously.
- Commonly employed for single crowns and short-span bridges.
Digital Impressions
Utilizes intraoral scanners to create a 3D digital model of the dentition.
Offers several advantages:
- Eliminates the need for impression materials and trays.
- Enhances patient comfort.
- Reduces chairside time and laboratory processing errors.
Limitations include high initial costs and potential difficulties in capturing subgingival margins.
Margin Management
Accurate impression of the tooth margin is essential for the success of fixed prostheses. Techniques to manage soft tissues include:
- Retraction Cords – Placed in the gingival sulcus to expose the margins. It Can be impregnated with hemostatic agents to control bleeding.
- Expasyl Paste – A non-traumatic alternative to retraction cords. It Creates space and controls hemorrhage effectively.
- Electrosurgery or Lasers – Used to recontour soft tissues and expose subgingival margins.
Comparison of Impression Techniques
Removable vs. Fixed Prostheses
| Feature | Removable Prostheses | Fixed Prostheses |
|---|---|---|
| Material Stability | Moderate to high (depending on material). | High dimensional stability required. |
| Functional Load | Functional impressions are critical. | No functional load required. |
| Margin Detail | Not as critical as in fixed prostheses. | Extremely critical for proper seating. |
Analog vs. Digital
| Feature | Analog Impressions | Digital Impressions |
|---|---|---|
| Accuracy | Prone to errors due to material handling. | High accuracy and reproducibility. |
| Patient Comfort | May cause gag reflex or discomfort. | Improved comfort and faster procedure. |
| Turnaround Time | Longer due to lab processing. | Faster digital workflows. |
Challenges and Solutions
Common Challenges:
- Material Distortion – Due to improper handling or delayed pouring.
- Poor Tissue Retraction – Leads to unclear margins.
- Incomplete Border Molding – Results in compromised retention for removable prostheses.
Solutions:
- Use of appropriate materials and techniques based on the case.
- Adequate training in digital and analog methods.
- Ensuring patient cooperation and comfort.
Advances in Impression Techniques
Recent advancements have revolutionized impression-making in dentistry:
- Digital Workflow Integration – Combines CAD/CAM technology with intraoral scanning. It Enhances precision and reduces turnaround time.
- Improved Materials – New-generation elastomers offer better hydrophilicity and tear strength.
- AI-Assisted Diagnostics – AI can analyze digital impressions for potential errors or pathologies.
Frequently Asked Questions (FAQs)
What is the difference between a preliminary and a final impression?
A preliminary impression is an initial mold taken to create a study model or a custom tray, typically using alginate or impression compound.
A final impression is a more detailed and precise mold taken with elastomeric materials, used for fabricating the definitive prosthesis.
Which impression material is best for fixed prostheses?
Polyvinyl siloxane (PVS) and polyether are the most commonly used due to their accuracy, dimensional stability, and tear resistance.
How do digital impressions compare to traditional impressions?
Digital impressions eliminate the need for impression materials and trays, improving patient comfort and reducing errors. They also integrate with CAD/CAM technology for faster production. However, they may struggle with subgingival margins compared to traditional techniques.
What is border molding, and why is it important for removable prostheses?
Border molding is the process of shaping the impression material along the periphery of a custom tray to capture functional movements of the soft tissues. This ensures a proper seal, improving retention and stability in complete dentures.
How do dentists ensure the impression captures the margins of a prepared tooth?
Techniques such as gingival retraction cords, expasyl paste, and electrosurgery/lasers help expose the margins before taking the impression, ensuring accuracy.
Can a dental impression be redone if it is inaccurate?
Yes, impressions should be redone if they show distortions, bubbles, or voids. Inaccurate impressions lead to ill-fitting prostheses, requiring remakes or adjustments.
What is the best impression technique for a single crown?
A dual-arch (triple tray) impression is commonly used, as it captures the prepared tooth, opposing arch, and bite registration in one step. Alternatively, a two-step putty-wash technique provides high precision.
How long does an impression take to set?
- Alginate: 2-3 minutes
- Polyvinyl siloxane (PVS): 4-7 minutes
- Polyether: 5 minutes
- The setting time varies based on the material and environmental conditions.
Are dental impressions painful?
No, but some patients may experience discomfort, gagging, or slight pressure. Digital impressions reduce discomfort significantly.
How can I prevent gagging during impressions?
- Breathe through the nose.
- Use distraction techniques (lifting a leg, counting).
- Request a fast-setting material.
- Consider digital impressions for increased comfort.
What happens after an impression is taken?
The impression is disinfected and sent to a dental laboratory, where it is used to fabricate the prosthesis. For digital impressions, the scanned data is sent electronically to the lab or milling machine.
How do I know if my dental impression is good?
A good impression has:
- No bubbles or voids.
- Clear capture of all details (tooth margins, soft tissues).
- Proper extension (borders in removable prosthesis impressions).
Do digital impressions work for all cases?
Digital impressions work well for crowns, bridges, and some implant cases. However, they may not always be ideal for deep subgingival margins, extensive edentulous areas, or complex removable prostheses.
Can impression materials cause allergic reactions?
Rarely. Some patients may have sensitivities to latex-based materials, polyether, or certain additives. Hypoallergenic options are available.
How should I take care of my impression if I need to transport it?
- Store in a sealed container with a moist towel (for alginate) to prevent drying.
- Ensure proper disinfection.
- Transport immediately to avoid dimensional changes.
Conclusion
Accurate impression-making is a cornerstone of successful prosthodontic treatment. Both removable and fixed prostheses require specific techniques tailored to the clinical scenario and patient anatomy. The integration of advanced materials and digital technologies continues to improve outcomes, ensuring that patients receive prostheses that meet functional and aesthetic standards.
Dentists must remain adept in both traditional and digital impression techniques to provide optimal care. Continuous learning and adaptation to technological advancements will ensure the consistent delivery of high quality prosthodontic solutions.